
Daily Guardian UAEDaily Guardian UAE
  • Home
  • UAE
  • What’s On
  • Business
  • World
  • Entertainment
  • Lifestyle
  • Sports
  • Technology
  • Travel
  • Web Stories
  • More
    • Editor’s Picks
    • Press Release
What's On

Beit Al Khair Society honours Hotpack for supporting massive charity meals initiative

July 22, 2026

Xteink’s tiny e-reader finally gets the upgrades it was missing

July 22, 2026

Al Ramz Capital Honored for Market Leadership and Innovationwith Three ADX Annual Members Recognition Awards

July 22, 2026

Instagram is finally giving your old posts a soundtrack do-over

July 22, 2026

Evest Leads the Global Sports through Smart Investing

July 22, 2026
Facebook X (Twitter) Instagram
Finance Pro
Facebook X (Twitter) Instagram
Daily Guardian UAE
Subscribe
  • Home
  • UAE
  • What’s On
  • Business
  • World
  • Entertainment
  • Lifestyle
  • Sports
  • Technology
  • Travel
  • Web Stories
  • More
    • Editor’s Picks
    • Press Release
Daily Guardian UAEDaily Guardian UAE
Home » How to lock cells in Excel
Technology

How to lock cells in Excel

By dailyguardian.aeSeptember 10, 20243 Mins Read
Share
Facebook Twitter LinkedIn Pinterest Email

Locking cells in a Microsoft Excel spreadsheet is a super useful thing to know how to do. It’s used to protect a certain segment or an entire worksheet from being modified by anyone other than the spreadsheet’s creator.

For example, if you’re an employer and you use Microsoft Excel to create a spreadsheet with multiple drop-down lists for applicants, locking cells will prevent recipients of that form from tampering with any of the data.

Here’s a guide on how to lock cells in Excel.

Locking individual or multiple cells

Step 1: An Excel spreadsheet might already be locked. Therefore, to lock individual or multiple cells, you’ll have to unlock the spreadsheet first. To do this, click the Green Diagonal button on the top-left side of the first cell.

The button to select all cells within a spreadsheet on Microsoft Excel.

Step 2: Right-click your mouse and select the Format Cells option from the menu.

The Format Cells button in Microsoft Excel.

Step 3: Select the Protection tab and unselect the Locked button. Click OK.
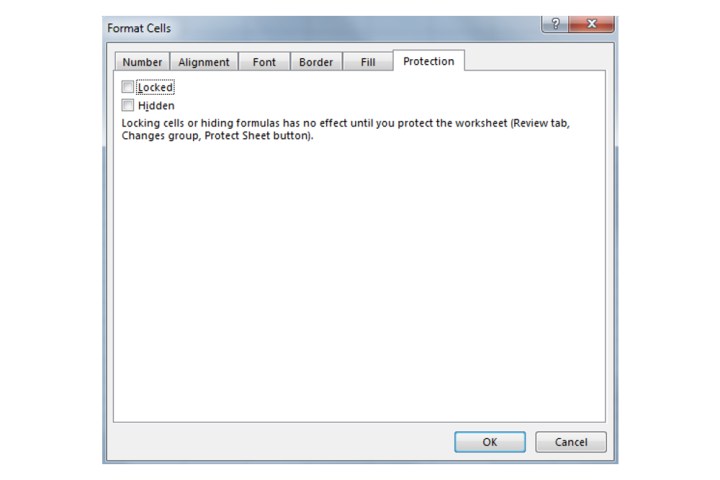
The Locked button found within the Protection tab in Microsoft Excel.

Step 4: Now choose what cells you want to lock by clicking on them. You can select a single cell, multiple cells, a row, or an entire column.

Step 5: Within the selected cell or cells, right-click and choose Format Cells.

Step 6: Navigate to the Protection tab again, select the Locked box, and then click OK.
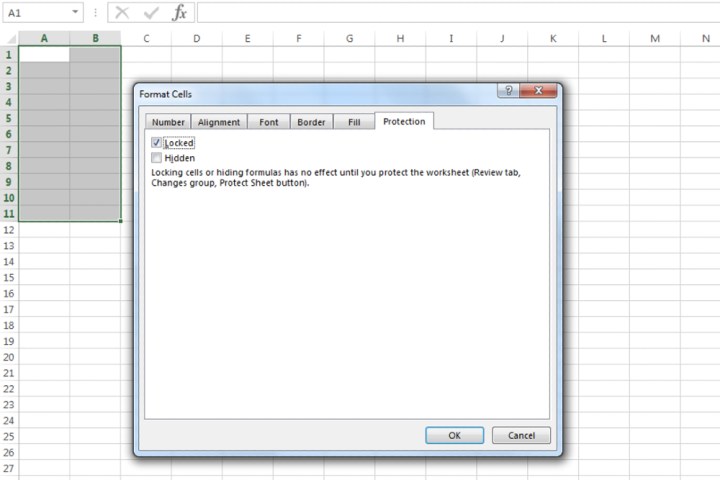
Locking specific cells in Microsoft Excel by using the Locked box.

Step 7: In order to confirm the locking of cells, click the Review tab. Now click the Protect Sheet option.
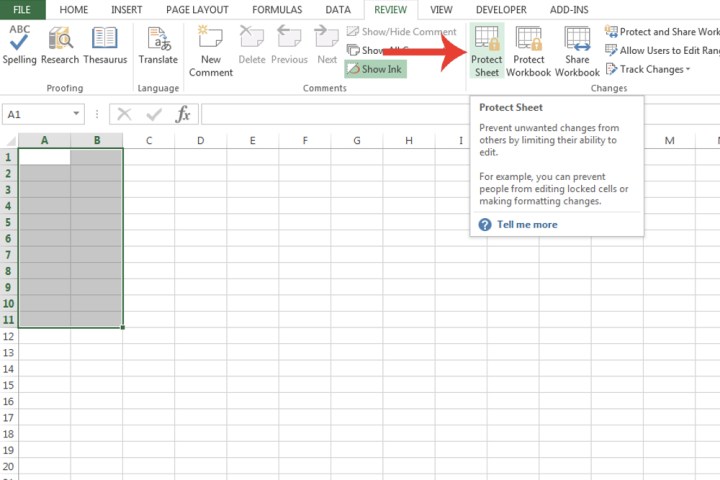
The Protect Sheet button in Microsoft Excel used for confirming the locking of cells.

Step 8: Choose what sort of protection you want from all the options shown. By default, the Select Locked Cells and Select Unlocked Cells fields are already ticked. You can also input a password for further protection. Click OK.

The cells you’ve chosen will now be locked.
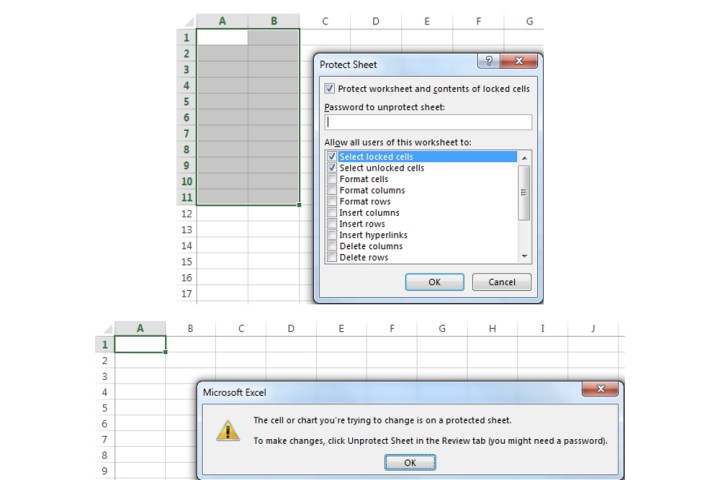
The Protect Sheet window where it lists all the configuration options connected to locking cells.

Locking an entire spreadsheet

Step 1: At the bottom of Microsoft Excel, right-click the spreadsheet you want to lock.

Step 2: Select the Protect Sheet option. As explained in step 8, customize the different types of protection you want to apply to the spreadsheet, then click OK. As we mentioned in step 1, Microsoft already locks an Excel spreadsheet, so you won’t need to take the steps to do so yourself.
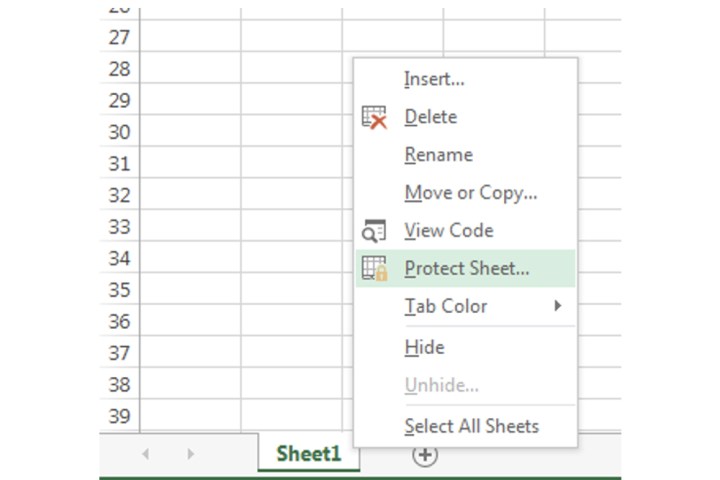
A shortcut to access the Protect Sheet option for locking an entire spreadsheet in Microsoft Excel.

Now you know how to lock and unlock cells and your Excel spreadsheet, you can retain better control over your data and avoid mistakes with entry.

Excel spreadsheets are considerably flexible, which makes the software suitable for all manner of purposes. If you know how to merge and unmerge cells in Microsoft Excel, you can use it for just about anything.


Share. Facebook Twitter Pinterest LinkedIn Tumblr Email

Keep Reading

Xteink’s tiny e-reader finally gets the upgrades it was missing

Instagram is finally giving your old posts a soundtrack do-over

Substack now lets you check if a post was written by AI

OpenAI says AI models autonomously pulled off a major hack, but only a Chinese AI helped recovery

China’s AI talent shortage has tech giants recruiting teenagers

Tesla’s Summer Update adds smarter Grok, personalized navigation, and Caraoke scoring

An unpatched Shark vacuum flaw could put your smart home at risk

Beatbot AquaSense X review: The pool cleaner for those that want to be pampered

I found an iPhone app that builds a skincare routine from a 30-second face scan

Editors Picks

Xteink’s tiny e-reader finally gets the upgrades it was missing

July 22, 2026

Al Ramz Capital Honored for Market Leadership and Innovationwith Three ADX Annual Members Recognition Awards

July 22, 2026

Instagram is finally giving your old posts a soundtrack do-over

July 22, 2026

Evest Leads the Global Sports through Smart Investing

July 22, 2026

Subscribe to News

Get the latest UAE news and updates directly to your inbox.

Latest Posts

Substack now lets you check if a post was written by AI

July 22, 2026

Union Coop Expands Digital Product Range to More Than 80,000 Items

July 22, 2026

OpenAI says AI models autonomously pulled off a major hack, but only a Chinese AI helped recovery

July 22, 2026
Facebook X (Twitter) Pinterest TikTok Instagram
© 2026 Daily Guardian UAE. All Rights Reserved.
  • Privacy Policy
  • Terms
  • Advertise
  • Contact

Type above and press Enter to search. Press Esc to cancel.